The purpose of this post is to list out the steps involved in making a mosaic so a complete beginner can make it.
Materials Needed* :
. Substrate: A small 4-8 mm thick mdf board piece
. Vitreous Glass Tiles
. Wheeled Cutter/Nipper
. Fevicol SH
. Fiber-tipped pen
. Plastic dish and knife
. Grout
. Admixture
. Sponge
Step 1: Prime the mdf board
To increase the adhering quality of any substrate, it is either scratched and primed or just primed. Priming of any  wooden/mdf board is usually done with diluted fevicol. Take a small blob of fevicol and double the amount of water, mix them up, and brush the watery glue onto the side of your substrate that will be mosaicked. Let the surface dry completely over some hours before using it.
Step 2: Draw or trace an image
Trace an image on the board using carbon paper or simply draw it with a pencil.
Step 3: Cut the tiles/tesserae
Decide the colours and cuts of your tesserae. Take out the required quantity of tiles in a sectioned tray. Cut them in the  shapes and sizes you wish to see in your mosaic. Little bit of nipping will be necessary with some pieces to fit them in odd places but it helps to keep the tiles cut before they are stuck. If you haven’t decided on the shapes of cuts…as it’s usually the case with me…cut tiles at least for the main element. The easiest cuts are halving the square tiles and then halving the halves to create small squares. You can create triangles by cutting the square tiles diagonally.
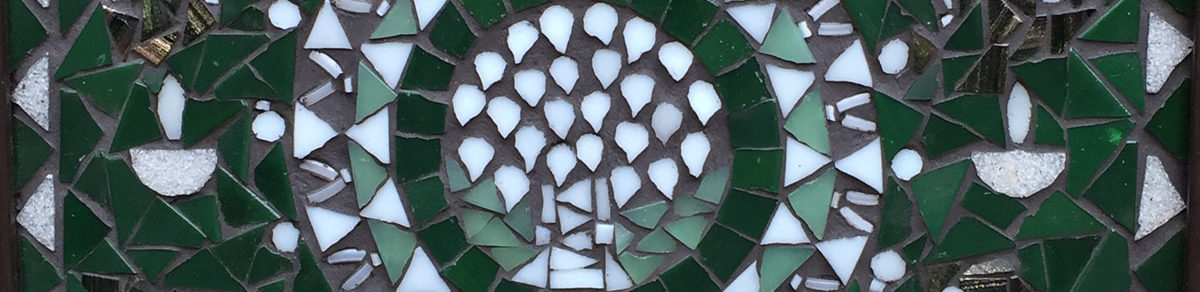
Step 4: Dry-lay the tesserae and decide the andamento
I prefer to dry-lay the cut tiles into the main element of my  mosaic so I can get an idea of their effect and I don’t have to remove them once they are stuck. Use a fiber-tipped pen to draw the exact shape or size of a tile’s piece that would fit in an odd spot and cut the tile along the drawn line. In the mosaic in the image, the background beige tiles are dry-laid to decide the flow that looks the best. I’ll stick them once I like the flow. The main elements and the border are stuck already.
Main Tip: Be mindful of the arrangement or flow of your tiles for a neat and planned andamento. A mosaic’s andamento lends it its main personality and character. As a mosaicist progresses on the path of mosaic-making, her compositions would reflect well-thought out opuses and not just a bunch of tesserae placed next to each other. This is what sets apart a mosaicist’s approach to laying tesserae over that of a mason. For your first piece though, you may just follow your instincts for tile cuts and placement to figure the basic technique of making a mosaic.
More Tips: I take breaks in between stages of arranging the cut tiles and their sticking so I can view the composition with a fresh eye on every visit to the work-table. I also like to click the mosaic in between so I can mull the colours or cuts on the phone’s screen while I’m away from the mosaic.
Step 5: Stick the tiles
Take out only small amounts of fevicol in a shallow dish so it finishes before drying up. Some artists like to use a spoon to take out the glue and place it upside-down on a flat dish to access the glue easily.
If you’re like me, you’d cut your tesserae/tiles small and find it easiest to pick them up only with pointed tweezers. Either way, use fingers or tweezers to pick up each tessera, place it ever so gently on the glue without losing hold of it, and then place it in its intended place on the substrate.
Tips: . Keep a paper tissue handy to wipe glue off your fingers and to clean the tips of the tweezers. Take just some glue on each tessera, and not an excessive amount, as extra glue will spread out of the tile’s surface and fill the gaps meant for the grout.
. I recycle ice-cream sticks, plastic knives, yogurt containers and all sorts of objects that keep appearing before me in life for various stages of making my mosaics so I suggest you start saving such items.
Step 6: Grout the mosaic
Grouting is done at least 24 hours after the mosaic has completed. It’s best done for the first time with someone familiar with it but the process itself is simple. Sanded grout is the commonly accepted grout as opposed to the un-sanded variation.
For a small mosaic, about 1 tablespoon of grout should be mixed with enough admixture (a capful to begin with) to form the consistency of thick porridge or peanut butter. Once mixed, it’s allowed a few minutes of slaking time and then applied with a rubber spatula on the mosaic. Attempts have to be made to gently push the grout down the grout lines created by the tesserae. Once the grout is smoothened over the surface of the mosaic, it’s allowed to rest for 5-10 minutes. After that a piece of wet sponge that has had all its water thoroughly squeezed out is used to clean the grout off the tiles. Care is to be taken to keep the sponge without any water to avoid soaking the grout with water. The sponge is turned about constantly to use all its clean sides and then washed in a mug of water to re-emerge cleaner and without extra water in it, and used again. Once the tiles are somewhat clean, the grout is allowed to dry over 30 or so minutes. After that a toothpick or metal pick is used to clean the left-over grout from the surface of tiles. As the grout dries some more, dry soft cloth is used to clean and polish the tiles so they lose any remaining film of grout from their surface.
Your mosaic is then ready to sit flat to dry fully and go for framing the next day.
Notes on the Materials:
. I find it easiest to source small sized 4 mm mdf boards from a local framer. For different shapes, I use Craftslane.
. Small quantities of vitreous glass tiles can be bought from Minimason and Sai Mosaic Art. Big quantities can be bought from local tile stores or Sai Mosaic Art.
. The easiest source of Wheeled cutters is still Amazon US. This Goldblatt cutter is heavier than a Leponitt cutter but it gets shipped to India, works well and stays good for a long time.
Slightly more expensive Wheeled Nippers meant for Porcelain tiles may be available from NBHT in Mumbai. Calling and talking to their Sales Head would tell you of their availability. My 3-part posts on tools carry leads to more tools.
. Grout and Admixture of brands Ferrous or MYKLaticrete are considered of good quality.
Glossary:
. Substrate – Any kind of base used to mosaic on
. Tesserae – Any materials/tiles/beads used to stick to substrate
. Andamento – The flow and direction of tesserae
. Opus – Many kinds of specific tile cutting and laying styles that form a mosaic’s andamento. Some of these are Opus Musivum, Tessellatum, Circumactum, Vermiculatum etc.
