Be Inspired, Don’t Copy 

Original Illustration by Kishore Bhargava

In my 4 years of self-training to be a mosaicist with no hardcore art background, I’ve used many online spaces to observe work, read tutorials and connect with mosaicists. There is widespread concern among many senior mosaicists on their work getting copied without any acknowledgement going to them as the original creators. There have been some who have accepted this phenomenon as a fallout of living and sharing in today’s Net-enabled world but it’s not that they are happy about it. Most others are openly critical of anyone simply treating images shown by Google Search or Pinterest as available to replicate. As a learner and mentor, this is what I advise a new learner to keep it nice and healthy for everyone.

  • Observe Intently. Look at lots of good quality work, observe the cuts  and andamento, and build a reference library of such work to learn from. Keep going back to these images only to observe as that helps internalise some aspects of those works.
  • Draw it out. Instead of tracing anyone’s work, just draw out several versions of those elements in your sketch book. By the 4th or 5th sketch, you will have made substantial changes from the original idea to make it remarkably different.
  • Use Nature, Folk Art, Still Life as your Prime Inspiration. Simply do this. You might claim to be a non-artist but you have admired landscapes, creatures, flowers or artefacts. You have decorated your living space with folk art or worn accessories with such art used on them. Draw out what you have admired and you will find many ideas in your sketchbook for your mosaics.
  • Use Simple Illustrations with your Preferred Fillers. Many mosaicists advise the use of illustrations from children’s books as they are simpler in their form and colours. Use such illustrations to fill them with zentangles, swirls, waves and colours of your choice.
  • Take Photographs. It is easy enough to click photos with smartphones. Take photos of what you see and like, build such a reference library and simplify such photos through your sketches for use in your mosaics. Birds and vegetation make good subject materials this way.
  • Take Help of Photo Editing Tools. You can run filters on your photos in Photoshop and phone apps like Prisma, Painnt and more to create effects and get ideas for your mosaic compositions.
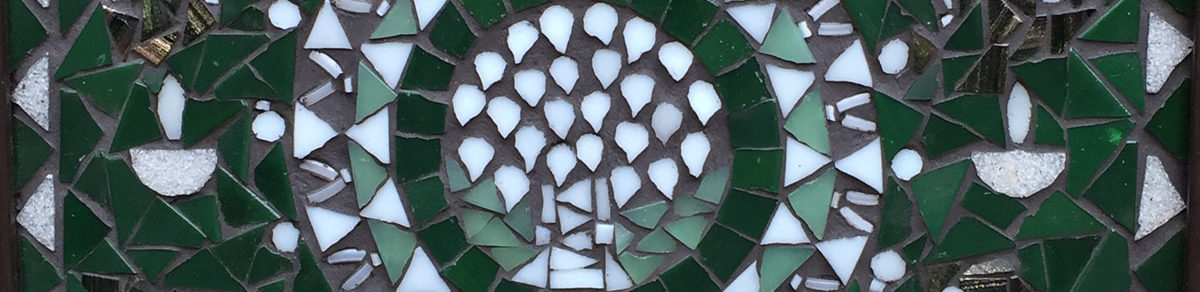
  • Reproduce Roman Mosaics. Small selected elements from ancient Roman mosaics have been copied by many either as they are or by changing their tile cuts and flow. These reproductions become useful studies to understand the cutting and laying of materials, and they are not frowned upon as copies.
  • Be original and Find Your Style. As you make more, you will know more. With every 4-5 mosaics, you would know your preference for materials, colours, cuts, design elements, etc and your future work will show a certain preferred style of your own.
  • Get Feedback on your work. Get honest and brutal feedback on your mosaics from other creators, your family, a visiting friend, mentoring groups and reflect on those reactions. Don’t feel bad about it for you’re learning to be a good creator and any feedback teaches you some things that you hadn’t noticed.
  • Copy to Learn but No Sharing or Selling that Output. If you must copy to further your understanding of anyone’s technique, keep that output as your study without sharing its image on social media or ever selling that mosaic even as an ‘inspired’ piece of work. Those learning to paint may be displaying such work in galleries but it is just not right.
  • Create Regularly, Save its Photo and Gift it Away. Merely observing and admiring others creative output would not teach you to be a good mosaicist. You must cut the materials and create compositions to take your lessons. Make lots of small mosaics, take their photos for your personal library and gift them all away so you can create space for more to display in your home.
  • Create Mosaics for Enjoyment. After making 15-20 mosaics, you may start getting commissioned to duplicate your earlier work. Take those orders by all means but don’t create only to sell. Create for the sheer pleasure of it so you can enjoy the journey of learning too.


Mosaic-making Tools

I’ve written multiple posts on sources of tools for India based mosaicists, but since they date back to 2 years, I’m presenting an update on the most essential tools that I find necessary for mosaic practitioners. The recommended tools are listed under the materials they can handle.

GLASS TILES AND CHINA

 Wheeled Nippers 

Sai Mosaic Art : As of now, Ahmedabad based Sai Mosaic Art is the only e-commerce enabled website in India that sells tools and tiles for mosaic-making. I recommend their wheeled nippers because they are fast to buy, they are well-priced and they work well enough. The site also sells replacement blades for these nippers. Approx. Price: Rs1400.00

NBHTPL : Mumbai Based New Bombay Hardware Traders Pvt. Ltd. sells these heavy duty nippers by RUBI (Rubi 83942) that cut glass or ceramic tiles or china with equal ease. They are more expensive than most brands of wheeled nippers but their advantages are their multi-material use, quality and availability. Approx. Price: Rs3700.00

Leponitt Nippers  from Amazon US : Although these nippers are not available in India, the reason for including them in the list is to highlight them as an ideal tool to own. Those with a choice to ship items from Amazon US to friends in the US and get them through their visits, must exercise the choice and acquire a pair. These are lighter in weight than most nippers I’ve used and have good quality blades. Approx. Price: $29.00

STAINED GLASS

Scorers

Toyo Thomas Grip Scorer from Amazon US : This scorer isn’t available in India but it’s considered as the best cutter for stained glass sheets. It can be sourced from Amazon US if one can find a helpful acquaintance travelling from the US. Approx. Price: $27.00

Toyo Pencil Scorers : I had found this scorer in a local hardware store on a visit but not on my next one. It’s worth checking with local stores on its availability. Other local brands do not have good quality blades even if they look like these. Approx. Price: Rs250.00

Stanley Glass Cutter : It works as well or even better than locally made pencil scorers. If one can’t source a Toyo scorer then this cutter is worth acquiring. Like with other glass scorers, it should be run onto a cotton swab dipped in kerosene or machine oil to lubricate its wheel before using on glass. Approx. Price: Rs140.00

Running Pliers

Studio Pro Running Pliers from Amazon US : To break a score on a stained-glass sheet, one needs a pair of Running Pliers. I use Studio Pro’s Running Pliers that I sourced from Amazon US. These may be available in Indian hardware stores under a different brand name but I haven’t seen them locally. If you do find such pliers locally, remember to buy only those that have a raised bump on the lower jaw to help break a score. Approx. Price: $11.00

CERAMIC TILES AND POTTERY

Scorer cum Snapper from NBHTPL : This tool by RUBI is a well-made and well-priced scorer-cum-snapper for ceramic tiles. They call it a Tile Cutter. It can be purchased from NBHTPL in Mumbai by sending an email to their Sales Head, Mr. Akshay Jain (akshayjain at nbhtpl dot com). Approx. Price: Rs700

Rubi Compound Nippers : These nippers from NBHTPL (Rubi 65926) are a good choice for shaping ceramic tiles. Their jaw has straight blades that aid breaking of ceramic tiles from the tile’s edge. Approx. Price: Rs1400.00

Sai Mosaic’s Professional Nippers : These nippers could become one’s second pair for shaping ceramic tiles. Their jaw has rounded blades that help with circular nipping. Approx. Price: Rs1000.00

MD Buildings Compound Nippers from Amazon US : These are my favourite compound nippers. I bought them from Amazon US at half the price mentioned against them at Amazon India. Amazon US still ships them to India so one should check if it makes sense to buy them from the US through a friend or on direct shipping to India. Approx. Price: $12.00


My Dremel Experience 

I’d long wanted to acquire a Dremel rotary tool to manage some tasks as a mosaicist. At some point, Amazon India’s discount sale brought the tool’s price down by a couple of thousand rupees, making it seem like an opportune time to buy it. If anyone else is considering its purchase, the information below may help one reach a decision.

The Right Model 

My enquiries in international mosaic groups had highlighted Dremel 4000 as the most apt model for my purpose as it had the power to allow long duration use as also enable varied cutting tasks. The price of Dremel 3000 was always more attractive but I tried my best to not succumb to the temptation to buy it. Too many people had mentioned that the model 3000 had blown up on overuse.

The model that I finally got from Amazon India is this one:

Dremel 4000-4/65 EZ 175-watt Multi-Tool Set (69-Pieces)

(An introductory video: https://www.youtube.com/watch?v=meyhj6QpedE)
4000 is the Model number; 4 denotes the number of attachments that come with the tool; 65 is indicative of the small accessories bundled in.

Upon checking on Amazon India now, I see that this model is no longer available. It’s possible that Amazon managed to sell its complete stock at that sale. One of the reviewers on Amazon had written that the e-commerce site is discarding its old stock through discount sales so I’m now waiting to see how long mine lasts. I do know from many users in the west that the model 4000 is what they’ve found to be working well.

Must-have Accessories 

My identified requirements from the Dremel tool were to : cut shapes out of acrylic sheets and mdf board; cut crockery; grind tile edges when absolutely necessary, etch ceramic tiles, buff mosaic jewellery, engrave wood etc.

Other than what came with the Dremel tool kit, I’ve bought the following additional accessories from Amazon India:

Dremel 4486 Multi Chuck (0.4-3.4 mm) 

To avoid having to change the collet repeatedly for different bits and mandrels, I decided to buy this multi chuck as it’s believed to work with all the accessories. Its idea is totally welcome but upon using it I found the accessory bit 561 getting dislodged on pressing into the hard surface of an acrylic sheet. I need to use it more often to determine its efficacy but I believe that its price of Rs599.00 makes it a worthwhile item in the kit.

Tools Centre’s 22 mm 10 Mini Diamond Saw Blades with 2 Shanks

Diamond blades are essential for cutting ceramic or china crockery with Dremel. Instead of buying Dremel’s expensive original diamond blade priced at Rs3500/piece, I decided to give this set of 10 blades a chance. The set came at Rs660.00, and till now, I’ve used one out of them to cut 4 shapes out of a 4 mm acrylic sheet. I found the blade to be more effective than any other bit in my original kit.  I’m sure they will come in handy for varied materials in the future. I’m just curious to see the longevity of each blade as they say that low priced blades lose their diamond surface rather rapidly. At the price they have come though, one can experiment with them without too much thought.

My First Project 

I’ve wanted to cut mdf and acrylic shapes for a long time. I believe that a Jigsaw or 3-ring saw are most appropriate for cutting mdf shapes but since I’ve wanted to use the Dremel tool for many things that it can possibly do, I decided to cut acrylic shapes with it. After testing the cutting bit 561 and SpeedClick SC456 that came in the kit, I found Tool Center’s diamond blades more effective for cutting the hard 4 mm acrylic sheets. It was tough to handle acrylic sheets as their cutting not only created a lot of acrylic powder in the air, the diamond blade led to slightly burnt acrylic edges. For those attempting this must wear a nose mask and protective glasses. Wearing anti-glass cut gloves may also help as sometimes tiny pieces of warm acrylic fly onto the hand holding the sheet.

The acrylic shapes had residual plastic stuck to their edges that also went away when rubbed against the surface of the diamond blade.

While I’d be cutting more acrylic, I’m not sure that I’d cut them in large numbers. The process is time-consuming and emits a lot of acrylic powder. Two of the shapes, however, have served as substrates for a small sun-catcher for my yard.

I wish… 

There is lots that isn’t in favour of buying this tool in India. It is pricey; Bosch Limited doesn’t do much to want to sell it (my calls and emails to them didn’t get me any response); Dremel tool’s original accessories are not only expensive, many times they aren’t even available online; Dremel-India’s website isn’t as informative as Dremel.com; Amazon India has far less product data available against the item/accessories than say Amazon US; its videos on Youtube or the company site are mere promos and not educative… And yet, hobbyists or artists in India have been buying the tool because of its perceived potential. Many glass artists I’ve connected with tell me that they bought it thinking that it’d help with many tasks but their prime use of it is to drill holes in glass, an essential need to create many stained glass objects.

I wish Dremel.com was doing much more to facilitate the tool’s handling and help learn the use of its accessories through better videos and live workshops. I believe I’ve watched every single video that’s available on it on Youtube but I still wasn’t entirely sure of the blade that would cut acrylic sheets easily. The Dremel India website doesn’t even allow search for accessories by their model number. One has to use Google to find that accessory’s page on the company website.

Useful Learning Resources

I found these sites to carry some useful views and advise that may help others too.

https://dremelamateur.wordpress.com/2013/01/02/my-dremel-4000-review-part-i/
https://dremelamateur.wordpress.com/2013/01/15/my-dremel-4000-review-part-ii/#more-388
https://www.eternaltools.com/blog/complete-guide-to-your-dremel-rotary-tool
http://dremelweekends.com/pvc-lamp.html
http://jmbh.org/DremelTute.html
https://blueroofdesigns.com/2009/08/07/dremel-resources-for-artists/
http://woodarchivist.com/310-choosing-power-carving-bits/

Do you use a Dremel tool? Do share your experience on its use and how it’s made your work easier.

Product Review: Resibond Clear 330–Silicone in a tube 

Resinova’s Resibond Clear 330 silicone has come my way through a Pune based member of the Mosaic India group. She had used the product to adhere stained glass to acrylic window panes and the adhesive dried clear. Later, I found the company website and emailed them an enquiry as I couldn’t find the product online. The email response gave the name of their NCR marketing representative, who called a little later to understand my application and pointed me to 2 of their products. He checked with his staff and also gave a shop’s name close to my location where I was likely to find the products. I went over to South City Hardware and Sanitaryware in South City-I market (Gurgaon, Haryana, India) and did find this silicone in 20 ml tubes. It cost Rs30/tube.

I’ve now used the adhesive to create the glass-on-acrylic mosaic in the image and it acted fine. It was easy to dispense, gave 10-15 minutes to move around the tesserae and started firming up. By the morning, the tiles were fairly firmly adhered. I decided to pry loose an odd shaped tessera with a pick the next day to cut it and paste the 2 pieces again, and that too worked well.

The mosaic got grouted without any major problem. The tiny specks inside the bird moved around a bit indicating the need for a bigger tessera surface with the adhesive on it to hold the substrate more firmly, but they didn’t come off.

The main learning was that the silicone is best applied smoothly on the (transparent) tile or, preferably, all over the substrate to prevent gaps from forming under the tile for the grout to seep in and remain visible through the transparent tiles.

As far as this product goes, I’m pleased to see silicone available in small tubes so one isn’t forced to cut open a big caulk for a small mosaic any longer.

I’d like to request the company through this post to make the product available through Amazon India so one can source it easily. Meanwhile, those in the NCR can get in touch with the NCR marketing representative for locations of dealers/stores that stock the Resinova products. Others can email the company for stores near their locations.

NCR Marketing Representative:
Mr. Ram Pratap
Astral Adhesives
Delhi Office: +91-011-26818810, 26814096
Mobile: +91-9999971908
Email: chemicals at resinova dot com

Online Mosaic Courses 

Mosaic Arts Online is the brainchild of Tami Macala who had started the Santa Barbara School of  Mosaic Art in 2009. All paid 8 courses on offer at present are managed by expert mosaicists who have years of mosaic-making and teaching experience. For those in India, however, the courses will feel more relevant and a worthwhile investment when we can find materials like glass rods, smalti or wediboards locally. Even if these courses came with the prescribed materials, sourcing smalti or glass rods remains a distant possibility for us in India. And yet, I’m really pleased to see efforts being made to provide mosaic tutorials through web based technologies in a structured way. It’s high time that the art and craft of mosaic-making is seen as an area of learning and pursuit the world over.
http://mosaicartsonline.com/courses

Roman Mosaic Workshops is a website owned by Lawrence Payne and focused on the art of Roman mosaics. He has designed kits that he sells with instructions, written articles on Roman mosaics, provided reference material on ancient mosaics on his site, and he has also designed 3 paid online courses and made them available at the link below. These courses on the rules, patterns and methods of creating mosaics follow a structured approach to learn and practice the art of laying stone or ceramic tesserae along the lines of Roman mosaics.
https://yescourse.com/~/roman-mosaic-workshops/#!

Kasia Polkowska offers some of the most helpful video tutorials on YouTube on cutting of stained glass. On her online course website on the link below, Kasia offers a paid course on creating a stained glass flower mosaic. She gives a choice of 12 flower templates that one can download once registered for the class. Another online course on her beautiful stained glass owls is under preparation that would offer 18 templates of owl patterns to choose from to mosaic.
http://www.kasiamosaicsclasses.com/course/online-flower-class/

Brett Campbell Mosaics has a wonderfully organised website showing his mosaics segregated in different categories, selling designs and patterns to buy online as also providing 2 paid courses to attend online from the link below.
http://www.mosaics.com.au/learn-mosaic/mosaic-classes-online/

Sharras Mosaic Secrets offers 2 online mosaic courses. I have known of Sharra Frank as a bead mosaic artist but I see from her site that she does a lot of beautiful glass mosaic work as well.
http://sharrasmosaicsecrets.com/courses

I’m sure this is just the beginning, and increasingly learners all over would have many more choices to get educated online on mosaic-making by known artists of the world.

Online Learning Resources 

As online search and reading come easy to me, I’ve depended on them regularly for varied learning. In the area of mosaic based orientation, I’ve found these websites and blogs to be wonderful resources, and I recommend them highly for beginners to read, reread and use the shared ideas for their mosaic experiments. All the tutorials and advice are made available free of cost here so when combined with a good book, a helpful online group and regular hands-on practice, they would amply support a mosaic learner’s quest to gaining confidence in the art of mosaic-making.

The Mosaic Store
This Australia based mosaic supplies store website is a wonderful resource for learning to mosaic. The website’s blog carries How-to project tutorials, tips and primers on tools that all beginners to mid-level mosaicists would find immensely useful.
http://www.themosaicstore.com.au/blogs/news

The Mosaic Supply Store
This US based mosaic supply store website is an ocean of ideas, primers and clarifications on all matters mosaics. Its owner Joe Moorman mentions this as his site’s mission statement that resonates with me entirely:

One of our most important goals is to promote contemporary mosaic as a fine art and encourage ordinary people to make original mosaic art in their own style. 

The FAQ itself is an exhaustive resource and must be referred to by all levels of mosaic practitioners.
https://blog.mosaicartsupply.com
https://mosaicartsupply.com/frequently-asked-questions/

I-C-Mosaics
The site owner Lou Ann Weeks runs an online mosaic supply store and writes this useful blog that covers the basics of mosaic-making. Her videos and posts promote her recommended mosaic consumables but one can still learn much about the general art and technique of making mosaics from her site.
http://i-c-mosaics.com/blog/articles.html#.WL704fmGOUm

Glass Campus
Dennis Brady started building this resource on glass fusing, cutting, selling and more when he saw that he had to work so hard to find the right information on techniques or tools. He built this website to share tutorials to promote free education to all. Most tutorials are focused on stained glass based techniques but a mosaic learner would find a lot of material of interest too.
http://glasscampus.com/tutorials.htm

Helen Miles Mosaics
There are a couple of blogs by mosaicists that I follow with interest. This one tops that list. Do read through the blog from its oldest to the newest post and enjoy Helen’s humour as also the knowledge she shares through her posts.
http://helenmilesmosaics.org

Let me know if I’ve missed any helpful mosaic learning resources that must be included in this post.

Mosaic Tools in India

Since my last 3 posts on mosaic tools, I have the following update and leads to pass along:

Sai Mosaic Art

This company has now begun selling the following tools and accessories from its website:

. Wheeled nippers
. Replacement blades for wheeled nippers
. Nippers for shaping ceramic tiles
. A set of 4 picks
. Fibre-glass mesh by meter

Their nippers and picks are available through Amazon India as well.

If the website’s payment gateway gives any problem, contact them on their email with your requested items.

Website: https://saimosaicart.com/

New Bombay Hardware Traders

NBHT has begun to stock all the tools necessary for handling ceramic tiles. The tool listing is as below with the prices as of December 2016:

Rubi 5975 Hand Held Tile Cutter
MRP: Rs. 685.00
Discounted Price Including Tax: Rs. 622.00
More Details at: http://www.rubi.com/en/ten-bric-manual-cutter-r25

Rubi 71970 Nippers for Glass Mosaic
MRP: Rs. 2,772.00
Discounted Price Including Tax: Rs.2,517.00
More Details at: http://www.rubi.com/en/nippers-for-glass-mosaic-r362

Rubi 65926 Nippers for Ceramic Tiles
MRP: Rs. 1,419.00
Discounted Price Including Tax: Rs.1,288.00
More Details at: http://www.rubi.com/en/nippers-for-ceramic-tiles-r361

Rubi 83942 Nippers for Porcelain Tiles
MRP: Rs. 3,689.00
Discounted Price Including Tax: Rs. 3,350.00
More Details at: http://www.rubi.com/en/nippers-for-porcelain-tiles-r358

Rubi 65925 Parrot Nippers
MRP: Rs. 2,307.00
Discounted Price Including Tax: Rs. 2,095.00
More Details at: http://www.rubi.com/en/parrot-nippers-r359

Rubi 12969 Manual Tile Cutter
MRP: Rs. 8,432.00; Discounted Price Including Tax: Rs. 7,656.00
Video at: https://youtu.be/bHLR8R9XUMA

For purchasing any of these tools, an email to the Sales Head, Mr. Akshay Jain (akshayjain at nbhtpl dot com) would get you the company bank details for making its payment. The tool would be couriered to any city in India.

Website: http://www.nbhtpl.com/contact-us

Lastly, it’s good to see that Amazon India has been enlisting mosaic media suppliers but it’s also disappointing to note that other than Sai Mosaic’s products, most other items are prohibitively priced. For now, one can buy mosaic books from them and wait till their product range increases and is priced better.


Mosaic Supply Store: Cefino, New Delhi 

Background

I’m pleased to share the lead to another India based glass tile supplier through this post. Two members from the Mosaic India group happened to learn about the supply store Cefino and bought small stocks of vitreous glass tiles from them. My calls to the company’s sales executive got me this information on their materials:

. Cefino imports vitreous glass tiles from China in size 20×20 mm, and manufactures ceramic tiles in size 1×1” in its factory located in Noida.

. The company sells tiles to retailers as also makes mosaics using whole tiles with the help of proprietary design software.

. It gets the imported tiles pre-stuck on sheets in single colours that it uses to create newer sheets with randomly mixed tiles or popular colour combinations for retail sales. As mosaicists, I mentioned, that we’ll be interested mostly in single colour sheets.

Cefino‘s manufacturing unit is in Noida, tile stocks are kept in Neb Sarai near IGNOU in New Delhi, and a small office is located in Malviya Nagar, New Delhi. The stocks can be seen only in Neb Sarai but at some notice the requested tiles can be sent over for the purchaser to the office in Malviya Nagar.

Range of Tilesimg_4189

. The following varieties of glass tiles are available in size 20×20 mm:

Classic: Rs100/sqft (grainy)
Gold line/Iridium/Crystal: Rs300/sqft
Marbella/600 series tiles: Rs720/sqftimg_4191

. Presently, the Classic range includes only the grainy variety of vitreous glass tiles.

. These prices are MRP as of October 2016 and may go through changes. img_4192To the extent possible, Cefino will offer some discount on their MRP figures.

Method of Purchase 

. Those located in NCR can request tiles from the company’s Sales Executive through Whatsapp by quoting the tile codes and quantities. They should include their address and mobile number in the message and fix up the specifics on stocks and delivery time through a phone call. When in stock, tiles can be made available at Malviya Nagar in 2 days after a prior request. One can go pick them up.img_4188

. Those in NCR have the choice of requesting the door delivery of tiles as long as the delivery person’s commute charges are reimbursed by the purchaser. When available, tiles will be sent over within 3 days to most locations in NCR.

. Cefino can sell a minimum of 1 sqft per colour of tiles.

. Outstation deliveries of tiles are also possible if the courier charges are paid in advance. Further details can be taken from the company.

Contact Information

Mr. Marutesh Singh
Sales Executive
Cefino
B-101 Rear Basement, Malviya Nagar
New Delhi  110017
Website: http://www.cefino.in
Phone: +91-11-41831004
Mobile: +91-9818636657

With this supplier, mosaic-makers based in India can order vitreous glass tiles in small quantities from 2 different sources. If you know of any more, do let me know.

Mosaic Supply Store: Sai Mosaic Art 

Background 

The need to source tools and tiles for mosaics has meant much web-trawling for me and on one such scan of Amazon India, I’d found small kits and stocks of crystal glass tiles being sold by Ahmedabad based Sai Mosaic Art. I found their website, emailed them to ask about their products, and if they would make them available to small scale mosaic-makers like me. I kept learning more about their products bit by bit. Not only that, a few weeks later, the company owner Mr. Patel spent a morning in Gurgaon while on the way to UP and met me and a few more mosaic-makers.

Mr. Patel made notes of our needs and approach to creating mosaics, said that he’d be keen to help small artists scattered around the country, and later shared with us a list of products, their pricing and minimum quantities that his company would supply. Apart from the adhesive, I’ve now used all their products listed below and can confirm that they indeed fulfil many requirements. Other than a wide range of glass and ceramic tile shades, their mesh is of good quality and works as intended. I’d bought a few small mesh pieces from Amazon US and paid much more than the rate offered by Sai. At least 2 of the 4 picks they sell are invaluable and at the price they come, those of you conducting workshops can easily keep 4-5 sets.

Sai Mosaic Art’s current product range:
(with the minimum permissible order per item)

  1. Crystal glass tiles in 15×15 mm size and 3 mm thickness – 1 sqft or approx 400 tiles
  2. Ceramic tiles in varying sizes in 5 mm thickness –  500 gms in size 1×1” with approx 80 pieces to fill 9×9” space img_3478
    . 12 pieces in size 4×4”
    . 4 pieces in size 6×6”
    . 2 pieces in size 12×8”
  3. Mosaic mesh by meter – 1×1 meter
  4. A set of 4 mosaic picks – 1 set
  5. Adhesive—white glue for indoor mosaics
  6. 3-board shade kit in ceramic tiles
  7. 8-board shade kit in crystal glass

Method of Buying  img_4001

. Email the tile codes with quantities to Sai Mosaic Art.
. Include your complete address and contact numbers in your email.
. Await confirmation via email on stock availability, time to be taken to despatch the items and the final amount to be paid.
. Transfer the amount to the seller’s bank account.
. Await the courier.

Where stocks are available, it takes upto 7 days to have the material in hand.

Contact Information  img_4003

Sai Distributors Pvt Ltd
A/7, SF, Millennium Plaza, Mansi Circle
Vastrapur. Ahmedabad 380 015
Gujarat, India
Ph:- +91 79 40009386
Fax:- +91 79 26764962 img_4004
Cell:- +91 98 25073678
http://saimosaicart.com/
EMAIL: saidistributors7@gmail.com

Further Tips from Me 

Crystal tiles: When you see the beautiful crystal shades on their website, you’d be tempted to acquire small stocks of all the colours for they look like jewels and cut easily with wheeled nippers due to their 3 mm thickness. They look smaller than 15x15mm because of their rounded corners so many mosaicists would be happiest using them without cutting. In fact the shiny SPR tiles must be used whole because of the gold foil used at the back but the rest of the marble or luminescent tiles cut well. My tip is to buy one sqft in each of the 5-6 colours that you’re absolutely sure of using and buy a set of shade boards at the same time. When seen up-close, the iridescence or luminescence of tiles is much clearer than their images make them appear so it helps to have the boards on hand to decide on colours. Place the rest of your tile order on getting hold of the shade kit.img_4006

Ceramic tiles: the smallest size available is 1×1” and they arrive in a perfect state in the courier. Bigger sizes tend to see some breakage but the company is good about replacing any broken tiles so don’t lose heart.

Mesh: The quality is good and even though it arrives folded, it straightens without much effort. img_3329

Picks: They are a must-have in every mosaicist’s kit.

Click on the images to see their bigger size.

Make a Mosaic 

The purpose of this post is to list out the steps involved in making a mosaic so a complete beginner can make it.

Materials Needed* :

. Substrate: A small 4-8 mm thick mdf board piece
. Vitreous Glass Tiles
. Wheeled Cutter/Nipper
. Fevicol SH
. Fiber-tipped pen
. Plastic dish and knife
. Grout
. Admixture
. Sponge

Step 1: Prime the mdf board 

To increase the adhering quality of any substrate, it is either scratched and primed or just primed. Priming of any IMG_3954wooden/mdf board is usually done with diluted fevicol. Take a small blob of fevicol and double the amount of water, mix them up, and brush the watery glue onto the side of your substrate that will be mosaicked. Let the surface dry completely over some hours before using it.

Step 2: Draw or trace an image 

Trace an image on the board using carbon paper or simply draw it with a pencil.

Step 3: Cut the tiles/tesserae  

Decide the colours and cuts of your tesserae. Take out the required quantity of tiles in a sectioned tray. Cut them in the IMG_3959shapes and sizes you wish to see in your mosaic. Little bit of nipping will be necessary with some pieces to fit them in odd places but it helps to keep the tiles cut before they are stuck. If you haven’t decided on the shapes of cuts…as it’s usually the case with me…cut tiles at least for the main element. The easiest cuts are halving the square tiles and then halving the halves to create small squares. You can create triangles by cutting the square tiles diagonally.

Step 4: Dry-lay the tesserae and decide the andamento 

I prefer to dry-lay the cut tiles into the main element of my IMG_3963mosaic so I can get an idea of their effect and I don’t have to remove them once they are stuck. Use a fiber-tipped pen to draw the exact shape or size of a tile’s piece that would fit in an odd spot and cut the tile along the drawn line. In the mosaic in the image, the background beige tiles are dry-laid to decide the flow that looks the best. I’ll stick them once I like the flow. The main elements and the border are stuck already.

Main Tip: Be mindful of the arrangement or flow of your tiles for a neat and planned andamento. A mosaic’s andamento lends it its main personality and character. As a mosaicist progresses on the path of mosaic-making, her compositions would reflect well-thought out opuses and not just a bunch of tesserae placed next to each other. This is what sets apart a mosaicist’s approach to laying tesserae over that of a mason. For your first piece though, you may just follow your instincts for tile cuts and placement to figure the basic technique of making a mosaic.

More Tips: I take breaks in between stages of arranging the cut tiles and their sticking so I can view the composition with a fresh eye on every visit to the work-table. I also like to click the mosaic in between so I can mull the colours or cuts on the phone’s screen while I’m away from the mosaic.

Step 5: Stick the tiles 

Take out only small amounts of fevicol in a shallow dish so it finishes before drying up. Some artists like to use a spoon to take out the glue and place it upside-down on a flat dish to access the glue easily.

If you’re like me, you’d cut your tesserae/tiles small and find it easiest to pick them up only with pointed tweezers. Either way, use fingers or tweezers to pick up each tessera, place it ever so gently on the glue without losing hold of it, and then place it in its intended place on the substrate.

Tips: . Keep a paper tissue handy to wipe glue off your fingers and to clean the tips of the tweezers. Take just some glue on each tessera, and not an excessive amount, as extra glue will spread out of the tile’s surface and fill the gaps meant for the grout.
. I recycle ice-cream sticks, plastic knives, yogurt containers and all sorts of objects that keep appearing before me in life for various stages of making my mosaics so I suggest you start saving such items.

Step 6: Grout the mosaic  

Grouting is done at least 24 hours after the mosaic has completed. It’s best done for the first time with someone familiar with it but the process itself is simple. Sanded grout is the commonly accepted grout as opposed to the un-sanded variation.

For a small mosaic, about 1 tablespoon of grout should be mixed with enough admixture (a capful to begin with) to form the consistency of thick porridge or peanut butter. Once mixed, it’s allowed a few minutes of slaking time and then applied with a rubber spatula on the mosaic. Attempts have to be made to gently push the grout down the grout lines created by the tesserae. Once the grout is smoothened over the surface of the mosaic, it’s allowed to rest for 5-10 minutes. After that a piece of wet sponge that has had all its water thoroughly squeezed out is used to clean the grout off the tiles. Care is to be taken to keep the sponge without any water to avoid soaking the grout with water. The sponge is turned about constantly to use all its clean sides and then washed in a mug of water to re-emerge cleaner and without extra water in it, and used again. Once the tiles are somewhat clean, the grout is allowed to dry over 30 or so minutes. After that a toothpick or metal pick is used to clean the left-over grout from the surface of tiles. As the grout dries some more, dry soft cloth is used to clean and polish the tiles so they lose any remaining film of grout from their surface.

Your mosaic is then ready to sit flat to dry fully and go for framing the next day.

Notes on the Materials:

. I find it easiest to source small sized 4 mm mdf boards from a local framer. For different shapes, I use Craftslane.
. Small quantities of vitreous glass tiles can be bought from Minimason and Sai Mosaic Art. Big quantities can be bought from local tile stores or Sai Mosaic Art.
. The easiest source of Wheeled cutters is still Amazon US. This Goldblatt cutter is heavier than a Leponitt cutter but it gets shipped to India, works well and stays good for a long time.
Slightly more expensive Wheeled Nippers meant for Porcelain tiles may be available from NBHT in Mumbai. Calling and talking to their Sales Head would tell you of their availability. My 3-part posts on tools carry leads to more tools.
. Grout and Admixture of brands Ferrous or MYKLaticrete are considered of good quality.

Glossary: 

. Substrate – Any kind of base used to mosaic on
. Tesserae – Any materials/tiles/beads used to stick to substrate
. Andamento – The flow and direction of tesserae
. Opus – Many kinds of specific tile cutting and laying styles that form a mosaic’s andamento. Some of these are Opus Musivum, Tessellatum, Circumactum, Vermiculatum etc.